Wednesday, January 29, 2014

Handling Rejected Messages - SOA 11G

Hi Guys,

Was busy past couple of months due to work and all. Finally got time to wrtie a new blog. Today, I would be explaining how do you handle rejection messages in BPEL. Rejection messages are basically the messages your composite receives but its not as per the format expected by your service , due to which BPEL instance do not get created. So your flow doesnot goes into your BPEL and there is no way to handle that exception in your code.

Below is the extract taken from Oracle:

The messages that error out before being posted to the service infrastructure are referred to as rejected messages. For example, the Oracle File Adapter selects a file having data in CSV format and tries to translate it to XML format (using NXSD). If there is any error in the translation, this message is rejected and are not be posted to the target composite.
Primarily, adapters and binding components are the generators of rejected messages.


To handle such scenarios where you need to take specific action if you get rejected messages, you can use fault management framework. Lets do it step by step.

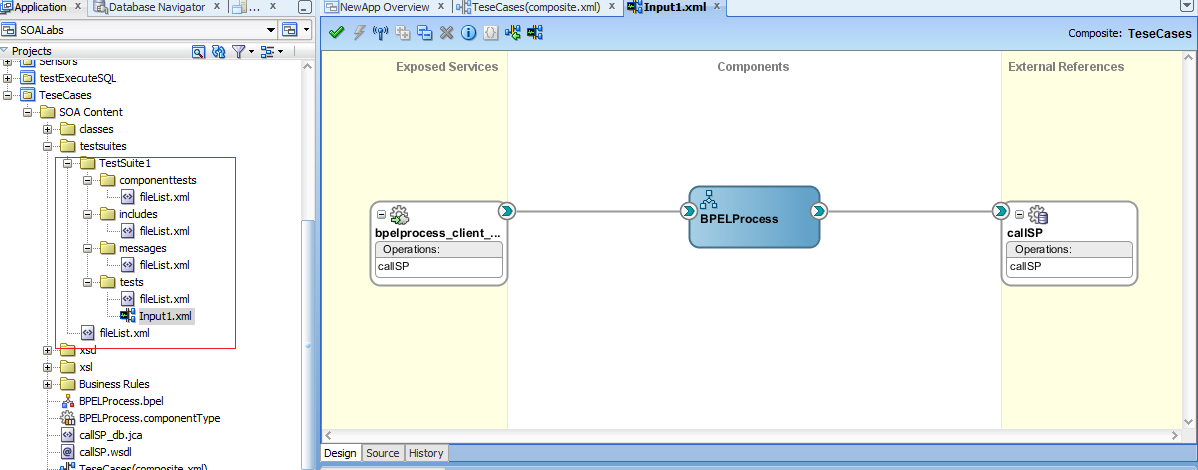
To illustrate this, I have created sample interface that reads a CSV file from a location and there is only single receive activity inside the BPEL that will receive the input.


Based on the CSV file , I have created a sample schema and configured our File adapter to read the file based on this schema.


My composite is already deployed on EM. Lets test it. This is the file that I have placed in input directory.


Instance will be created , since the file is in correct format. Verify by opening the instance and checking your input.


Now create a Fault Policy file and fault bindings file and place it in the folder that has composite.xml.


Open the fault policy file and define a fault policy for the rejected messages in the fault-policies.xml file, stored with the composite.xml file in the JDeveloper project directory. In the file add the name of your service adapter in the faultname section. In our case it is "readFile". And the action define "writeTofile" that will write the rejected message in the location specified with the filename that is given.


Now associate the fault policy with a service endpoint of the composite in fault-bindings.xml, as is done in the following screenshot:


Deploy your composite and place some file in the input directory thats not as per the schema.


New instance wont get genereate. Instead you will see error message under "Faults and Rejected Messages". Click on the error message and open payload. 


Now this failed message will be writtten to the file and the location that we gave in our fault policy. Go to that location and verify the same.

This way , we can handle rejection messages and take appropriate actions depending upon the requirements.

For more information please refer Oracle Documentation: Rejection Messages

Hope this post was useful to you.

Happy Learning,
Cheers 

Thursday, October 17, 2013

DB Adapter Polling using Sequencing File - SOA 11G

I will be explaining today steps to create a polling DB adapter based on sequencing file.Most commonly used After Read "Logical Delete" strategy, I have explained already in one of my previous posts.So, I will just explain configuration required for sequencing file polling DB adapter. Remaining configuration, how to configure DB adapter , please refer to my post on DB adapter tutorial.

Step1: Open up your DB adapter wizard and select "Poll for new records or changed records" in the operatrion tab and in step 8 of After Read screen, select Update a Sequencing File.

Step2: Click next. In next window that pops up, select the sequencing file by passing the complete physical path.I have created a sequencing file on my server only under my servers logs directory.In sequence ID field, select the field from table which will act as sequence ID and on basis of which DB adapter will poll for new records.In my case I have selected Transacion ID.Complete the all steps and design your BPEL process.
Step3: Now If you look at my table structure, there are two columns Transaction Id and Notes.Our DB will poll on Transaction ID. Let me explain you, how this sequencign file concept works.
You have to create one sequencing file and in that file you will enter value of only that field which will always be incremented in ascending order in the table when new records are being inserted. Lets say in table we have 3 records with transaction ID as 1,2 and 3. In my sequencing file I will enter 1 and save it.Now Our DB poller will poll for all records with transaction ID greater than 1(current value in sequencing file) and value in the sequencing will automatically will be changed to 3. Next time new records inserted with trabsactiond ID greater than 3, all those records will be polled and so on.

Step4: I have created one sequencing file with transacion ID value as 4304.Please note only sequence ID(transaction  ID in our case) value should be there in file, nothing else.
Step5: In my table I have 3 records that have transaction ID greater than 4304. All those records will be polled. Verify the same on EM under instances Tab.
Step6: Also verify your sequencing file to reflect the updated value of transaction ID as 4393.
In this way DB poller based on sequencing file works.
Hope this post is helpful to you.

Happy Learning,
Cheers,
Karan


Friday, October 11, 2013

Unable to Edit Database/File Adapter in JDev - SOA 11G

Hi All,

There is one issue that lots of people faces while importing an existing SOA project into JDeveloper.For instance, you have a composite that is polling records from DB and writing it into some file. After importing when you try to edit DB or File adapter by double clicking the wizard simply wont open up. Strange isnt it.
Even if you reimport the same project it will still not open.What could be the issue here.

The simple solution or workaround you can say is add the below line in your respective WSDL file of File or DB or JMS adapter(any JCA adapter):
<?binding.jca readFile_file.jca?>


where readFile_file.jca is the jca file name of your file adapter. In case of DB Adapters, it would be filename_db.jca and in case of JMS adapter would be filename_jms.jca and hence so on for all other JCA adapters.


Save your WSDL file close it and now double click on your adapter. Bingo its opening now :) Nice isn'it.

Hope this post will help many of you frustrated facing such type of issues.

Happy Learning...

Cheers,
Karan

Friday, August 30, 2013

Skipping Activites Execution in BPEL

Hi Guys,
 
I have been away from the blog for quite some time due to work and all.Finally got time to post new blog here. Today I will be explaining the new feature that is available from 11.1.1.6 onwards.Some of you may already knowing it but for those who dont let me tell. You can now skip activities in your BPEL flow without using any switch or if condition. Oracle provides an extension that enables you to specify an XPath expression in an activity in BPEL versions 1.1 and 2.0 that, when evaluated to true, causes that activity to be skipped. This functionality provides an alternative to using a switch activity for conditionally executing activities. The skip condition for activities is specified as follows:

<activity bpelx:skipCondition="boolean-expr"/>

The bpelx:skipCondition attribute causes an XPath expression to be evaluated immediately upon creation of the activity instance. If the skip expression returns a false boolean value, the activity is executed. If the skip expression returns a true boolean value, the activity is completed immediately and execution moves to the activity immediately following that one.

This construct is equivalent to a switch/case structured activity with a single case element with a condition that is the opposite of the skip condition.

I will be demonstrating how to use it.Suppose in my code whenever I pass the input as 5 , I want to skip this invoke activity. Means I dont want this activity to get executed.

How do we go about it.Double click the invoke activity. Go to "Skip Condition" tab. Click on expression and write out your expression as shown in the screenshot:
Now, whenever I will pass the input value as "5", this invoke activity wont be executed.In the flow trace you will see this activity as "Activity Skipped".
There you go.In this way you can skip any activity you intend to skip without coding switch/IF condition in your BPEL code.


Hope this helps.

Happy Learning,
Cheers !!!

Wednesday, July 31, 2013

Unit Test Cases tutorial for SOA Composites - Oracle SOA 11G

Hi Everyone,

Today I will be describing how to create, deploy, and run test cases that automate the testing of SOA composite applications. You can also create test cases for testing BPEL process service components included in the SOA composite application. Test cases enable you to simulate the interaction between a SOA composite application and its web service partners before deployment in a production environment. This helps to ensure that a process interacts with web service partners as expected when it is ready for deployment to a production environment.

In this type of testing, wires, service binding components, service components (such as BPEL processes and Oracle Mediator service components), and reference binding components are tested.

Overview of Test Suites

Test suites consist of a logical collection of one or more test cases. Each test case contains a set of commands to perform as the test instance is executed. The execution of a test suite is known as a test run.

Before starting let me explain you two basic terms that will be used while creating test cases. These are

Assertions : You perform assertions to verify variable data or process flow. Assertions enable you to validate test data in an entire XML document as a process is executed. This is done by extracting a value and comparing it to an expected value.

Emulations: These are used to simulate the message data that your SOA composite application receives from web service partners.

Usecase:


I have created a sample SOA application having BPEL service exposed as web service and wired with DB adapter which is used to call a stored proceudre that I have created.The input for this interface is a string variable and its value would be passed to stored procedure as an input parameter by our BPEL process.In response stored procedure will return response based upon the input passed.Below is the list of input and output that would be returned by SP:

Input: 1 , Output: you entered one
Input: 2 , Output: you entered two
Input: 123(any random value) , Output: Default Output

I will be creating test case for first and last input only to show you guys how it works.

Step1: In project explorer,navigate to "testsuites" then right click and click on "Create Test Suite".
Step2: Give the name as "TestSuite1" and click ok.
Step3: Another window will open up prompting for test case name.Give it as Input1 and click OK.
Step4: You will under project explorer test suite is created and your composite will open in test mode.
Step5: Now, the input that would be passed to our interface, we will add.Right click on your exposes services partner link and click "Create Initiate Messages".
Step6: Initiate message window will pop up.Here either you can pass the input payload by loading from a file or manually.I will pass it manually.Click on generate sample button.It will generate sample input payload with dummy value.Since,we are testing for input 1,pass 1 in the input.
Step7: Now right click on wire between BPEL component and DB adapter in the external references lane and click "Create Wire actions".
Step8: Window will pop up with operations in the left pane and Asserts and Emulations tab on the right pane.Here we will pass input that is expected by our DB adapter.Under asserts tab,click on "+".
Step9: Assert Input --> Generate Sample. Again pass 1 in the input payload.
Step10: Similarly for asserting output,click on "+" again and add Assert ouput with correct value in the response that we are expecting from this reference.Please note assertions means the values that are expected by composite and emulation means emulating dummy response rather than calling the external web wervices/references in actual.Emulations for now leave it, I will explain it later on in this post.
Step11: Your test case will look like this.
Step12:  Likewise,add one more test case with name as "RandomInput" to test the composite for scenarios in which random values are passed.

Step13: As we did for our first test case ,create initiate message with input as "123".
Step14: In this case we are expecting output as "Default Output".

Step15: Now we are good to go.Save all and deploy your composite.Open up your composite on EM and click on Unit test tab.Here you will see two tabs beneath "Unit Test" namely "Test Cases" and "Test Runs".You will see two test cases that we had created earlier.you can either execute both the test cases together or one by one.I will be executing them together by clicking on execute.
Step16: Window will pop up asking you to give a name to this test run.Enter "SampleTestRun" and OK.
Step17: You will be immediately shifted to "Test Runs" tab where you will see the status of your test cases.It will be showing as "RUNNING".Keep on clicking Refresh Test status after some time.
Step18: You will see that test cases has been executed successfully.

Step19: Click on input1.xml which is our first test case and click on the "XML" link.Window will pop up showing you the value that was passed to this test case and value that was expected.If both matches then test case passes.You will see 1 in both actual and expected payload.
Step20: Similarly check for output of our first test case again by clicking on second "XML" blue link and verify the outputs.
Step21: Likewise output for second test case.
Step22: Now how the test case behaves in case value expected and actual value does not match.Go back to JDev and open first test case and edit wire actions section where we had added assertions earlier both for input and output.Now what I will do is,simulate the output that stored procedure returns.Means when we will run this test case ,our DB adapter will not be invoked and in turn emulated output will be returned back by composite in the actual value section.Go to Emulate tab and click on Add.
Step23: Add emulate output and enter dummy data in the output paylaod.
Step24:Save and deploy.Test your this test case again.This time its state will be shown as "Failed" which means our test case did not pass.
Step25: Open up the xml and see the value in actual and expected value section is different.Hence,it failed.
In this way you can add number of test cases you want to your SOA composite application and before deploying them to production you can test your composites functionality whether they are behaving in expecting manner or not.For more information refer Oracle documentation HERE

Hope this post help you guys.

Happy Learning,
Cheers !!!